6.13.2014

So Very Much

So very much has happened since my last post. I finally got a job, after almost a year of looking. Just over two years later and I'm still there! It's a great job and a great place to work.

Got to work one day to find a whole flock of yard flamingos out front 


Just after I started my job we closed on our first house! We've spent the last two years making it feel like home and traveling around and enjoying our new state. Oh and I almost forgot, we also adopted a cat. She's our first pet in the 10 years that we've been together. Her name is Olive and I absolutely love her. She has so much personality, it's amazing.

Olive


Things are finally starting to feel settled down for me and I intend to try and start blogging again. It's funny, tonight I sat here and read through some of my old posts and I don't even remember writing some of it, I'm glad that I have the "journal" of my blog to look back through.

There is so very much more to tell, but I think I'll save some for next time :)

2.15.2012

Dryad Scarf

In typical fashion, I've been working on several projects at once. Still trying to get some wallets done for my etsy shop. I also have a couple of big knitting projects going. One is the beautiful Dryad scarf by Jared Flood, and the yarn I got for it is so amazingly soft! The pattern is all cables though so it's going to take me awhile to finish (I will probably get it done when it's too warm outside to need it). It's already getting close to that here it seems, it feels a lot like springtime!


I've also been working on my second sweater. I would post a pic of it, but it's on circular needles so it just looks like a jumble of fabric. But the way it's worked is so much different than the first sweater I did, it's pretty neat. I can see how this way would be easy (well easier anyways) to make my own pattern.

I made these coffee cup sleeves quite awhile back, I just haven't gotten around to photographing them until now. There's a coffee shop down at the water front park and for some reason they never seem to have cup sleeves, so I decided to make some for us.


I am hoping to write up the pattern for them...eventually.

1.16.2012

Double Point Needle Case

Well Josh didn't go snowboarding on Sunday like he had planned, so I'm just getting to work on my tutorial today. This is my first sewing tutorial and only like my second tutorial overall so hopefully it makes some sense, I did notice while editing photos that I got ahead of myself and didn't get some pics, but hopefully they were pretty self explanatory steps. This is done very similar to the wallets that I've done so if some of my expanations are lacking the wallet tutorial should fill in the gaps. Well here goes nothin'...

Double Point Needle Case


Supplies

Fabric for outside, inside lining, pockets, and flap
Medium weight iron on interfacing
Heavy interfacing or Felt (optional to stabilize)
Magnetic snap

Instructions

Cut fabric as follows:

2 pieces 10.5"x13.5" (one for outide and one for inside lining)
1 piece 13.5"x8" (large inside pocket)
1 piece 13.5"x6" (small inside pocket)
2 pieces 13.25"x6.5" (inside flap)
2 pieces 2.5"x5" (snap tab)
1 piece 12.25"x9.5" (optional felt)

1. Take the 13.5"x8" piece, fold top side down 1/2" (so the wrong sides are facing), press.
     Top stitch about 1/8" from the folded edge.
2. Repeat for 13.5"x6" piece.


3. Line up the bottoms of the two pocket pieces, making sure that the top edges are parallel.

4. Using fabric marker or pencil, mark lines for needle pockets. Mark lines on smaller pocket first, then transfer these lines to larger pocket. Add additional lines to larger pocket.


5. Pin larger pocket to inside liner (10.5"x13.5") lining up the bottom edges. Draw a line 1.75" from bottom. Stitch along this line. Then stitch along lines for pockets, stopping at top edge of pocket.


6. Pin smaller pocket to this piece lining up the bottom edges, make sure that the top edges are parallel and that the markings for the needle pockets line up. Stitch along lines for needle pockets, stopping at top edge of smaller pocket.


7. Take both 13.25"x6.5" pieces and pin right sides together. Using 1/4" seam allowance sew around edges leaving a hole for turning on one of the long sides. ( I did not interface this piece, but it couldn't hurt. If you do, use the medium weight)

I didn't take a photo before I stitched this up, but the yellow lines show where you should sew

8. Clip corners and turn right side out. Press, tucking in the edges at hole used for turning.

9. Top stitch along 3 sides leaving one of the long sides unstitched.

10. Pin flap piece to top of inside piece (unstitched edge of flap piece at the top) . Line up 1/2" from top. Top stitch about 1/8" from edge of flap.


11. Using manufacturer's directions interface the back sides of the two 2.5"x5" pieces and the two
10.5"x13.5". (Use a heavy interfacing on the outside piece if desired)

12. Take the two 2.5"x5" pieces pin right sides together. With 1/4" seam allowance sew around leaving one of the small sides open.

13. Following manufacturer's directions attach the 'male' side of the magnetic snap to tap 3/4" from top edge (not the open edge). Turn right side out and press.

14. Top stitch 1/8" from edges leaving open side open.


15. Install 'female' side of magnetic snap to outside piece 1.75" from one of the small sides.


16. Tuck in the flap to avoid stitching it in the edges.


17. With right sides facing pin the outside piece to the inside piece. Place snap side at the left.


18. Using 1/2" seam allowance stitch around edge leaving an opening on the small right edge for turning.


19. Clip corners and turn right side out. Press, tucking in the edges at the opening used for turning.
      (If you want to use a piece of felt to stabilize this insert it into the side at this point. I wish I had done this)
20. Insert snap tab piece into the hole used for turning, make sure the snaps align.


21. Top stitch around the main piece, you may need to switch to a heavier needle (I use a leather needle).


I hope these directions make sense and work correctly. If you want to make a roll bag instead of a book form, you can place the snap farther in from the edge, or substitute for velcro or use a ribbon as a tie. Also the measurements could easily be altered to hold paint brushes or straight knitting needles, even makeup brushes for traveling.

1.13.2012

Sewing Again

While my sweater pieces are blocking I decided to change it up and break out the sewing machine. My friend Brooke sent fabric for a wallet so I have been working on that, the timing was perfect. I wish I could take credit for these colors, I think this wallet turned out amazing!


I've been toying with the idea of selling these on my etsy site, and working on Brooke's kind of got me jump started on that. This is the only one I have done so far, these things take a bit me a bit of time to do. I love this fabric...


Check it out in my etsy shop.
 Tomorrow or Sunday I'm going to post a tutorial for this double point knitting needle case that I made.


1.05.2012

Knitting like crazy

I'm not sure a day has gone by over the last few weeks that I haven't worked on some knitting project. My mom gave me yarn for Christmas for this gorgeous cardigan, so far I've gotten the back and the left front done. It's my first attempt at a sweater so I'm keeping my fingers crossed.


I love this seed wishbone stitch
I rarely use the yarn called for in a pattern, but since this is my first try at a sweater I went with the recommended and let me say I really do love this yarn.

While taking a break from my sweater to give my wrist a break I knitted this hat. It's my first attempt at multicolors, and the technique used is a great one to know. I think even Josh wants a hat like this but with straight lines instead of wavy. But he is going to have to choose another color to go along with his grey.

Holy smokes I did something in bright colors! Hooray me!
 For this hat I used Paton's Classic Wool. It's turning out to be one of my go to yarns, plus it's easy to get since Michael's is just down the street.

On a different note, we've started growing herbs for our kitchen window sill:

Basil

I bought this mug for myself as a stocking stuffer (I love this color) and when I went to wash it, it was cracked all down one side. Not sure when it happened but the crack isn't bad enough to let water leak out through the soil, so that is what gave us the idea to plant the herbs in coffee mugs. We only have two so far, but since these little guys are growing I'm sure we'll plant more.


Cilantro (yucky!)
Will post some pics when the indoor herb garden project gets farther along.
It's kind of a grey, rainy day today so I didn't have much natural light to do my photos. Had to rig up an indoor studio (and I don't have studio lights). I didn't think they turned out too bad for using a speedflash.

Gotta love the booze bottles holding up my fill cards!

12.22.2011

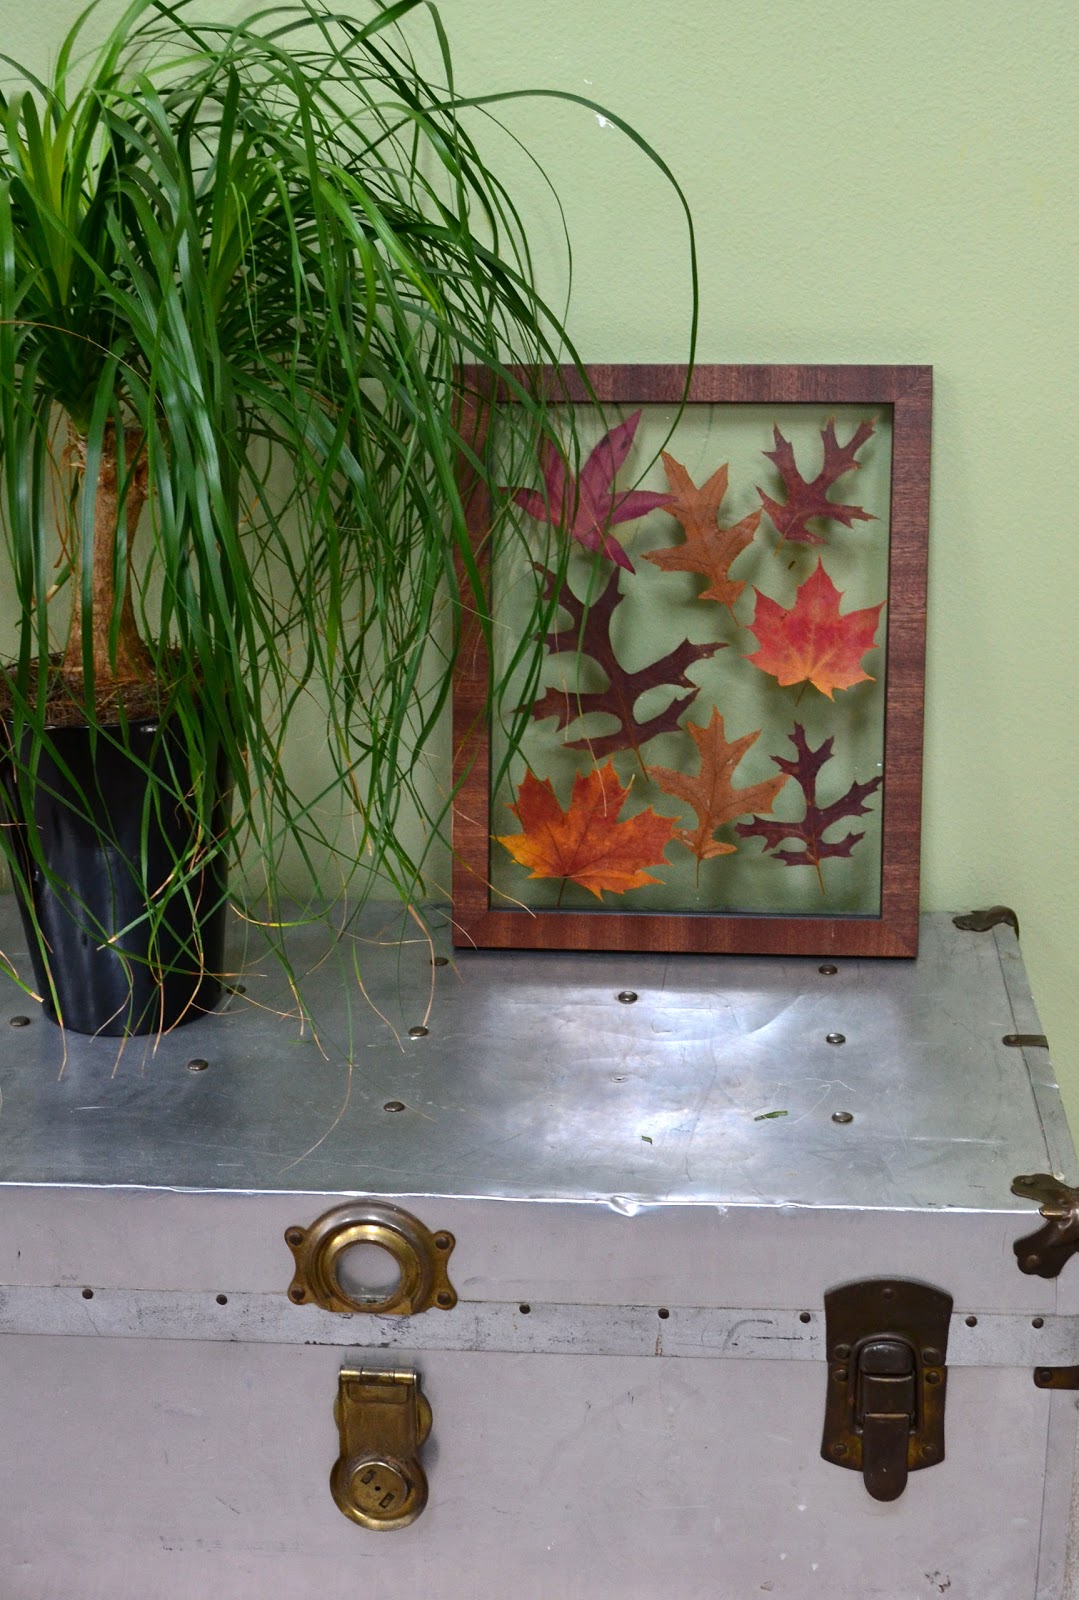
Pressed Leaves

Until this year I never knew that I hadn't experienced a real fall season. In Wyoming the leaves go from green to brown, then get blown off of the trees. That all happens in the span of about a week. It's pretty much the same in Colorado and Montana.

Well I've got to say our first fall in the Pacific Northwest was amazing! The leaves turned so many different colors: red, pink, orange, rust, bright yellow and chocolate brown. We took several walks around the neighborhood to look at all of the color. To our amazement the leaves stayed on most of the trees for atleast a month, and some even still have their leaves. There are so many trees here the ground was just carpeted with color when they started to fall off.

On one of our walks we picked up some different leaves and pressed them in the phone book. Finally got around to taking them out last week to see how they turned out. They kept a fair amount of their color, so we put them in floating frames so that light could get through.


12.19.2011

Christmas time

I've been doing a lot of work trying to get Christmas presents done, and of course working on some other projects. Right now I'm working on a throw pillow, for some reason I'm obsessed with the idea of having a couch full of pillows. I've also made a few coffee cup sleeves that I will get posted soon, I just have to go get a coffee, so I can get a picture of them.

In the mean time I'll share some of my Christmas decorations. I don't really decorate the whole house for Christmas, but we will actually be here this year so I wanted to do something. We still have our tiny apartment sized tree, which I will be replacing before next year I hope. But this year we do have a fireplace and mantel, so that was exciting for me.


I'd seen glass ware filled with ornaments on Pinterest and loved the way they looked. I almost want to leave them out year round. My mom made the chain of bells for me a couple of years ago. I usually put them on the tree, but the mantel was looking kind of bare and they're so cute and colorful I decided to use them as a garland on the mantel. Also before next year I hope to knit some stockings for us, the store bought ones just aren't doing it for me.


This is my favorite ornament. My sister gave it to us for Christmas 2009, which is the year Josh & I got married. I wore white Chucks for our wedding, so this ornament was just too perfect!

12.05.2011

Husband Beanie

Well I've gotten my second (for the public) pattern up on ravelry. I've decided to call it Husband Beanie, since it's more universal sounding. Plus when I was looking for a pattern for Josh's hat I totally would have looked at a pattern with that name. Josh picked out the yarn, go figure it's grey. It's Cascade Yarns 220 Superwash Wool.

The sun was in his eyes, and apparently made him a little
cranky. I got one picture where he looks super p.o.'d
and he's looking directly at the camera, but I've been
forbidden to post it. (It's hilarious though!)
It was a gorgeous day here yesterday (and it is again today, yay!). We went for a little drive to this scenic outlook, and then went up to Nooksack Falls on Mt. Baker. You can see Mt. Baker in the photo, it's the snowiest peak on the far left.

Kind of hard to believe it's December.
I love the weather up here!

Nooksack Falls
Been trying to come up with a new idea for a pattern, but I think that well is dry for the time being. Guess I'll have to finish some of the projects in my bin...

12.02.2011

PICC line covers

When I was in the hospital a few years ago I had to have a PICC line put in. Now it definitely wasn't the most pleasant experience in the world, but it sure did beat getting poked repeatedly in the same spot. To cover the tubing coming out of my arm, they gave me a flimsy gauze sleeve which functionally did the job, but did nothing to hide it. Now that's all well and good in the hospital, but I still had my PICC line when I went back to work, and people commented on it constantly. Anyone that's been in a similar situation knows how annoying that is. Well today on ravelry I found this great pattern for a PICC line cover. Just a simple knitted tube, but holy cow would that have been nice to have! This is a great way to use that leftover yarn, I'm definitely going to start making these. They would also be cute with stripes or cables to make them a little fancier.

Here is a website with some more information about these http://findingjennproject.blogspot.com/2009/02/original-picc-cover.html

It does look like the website is a couple years old with no recent updates, so if you're planning on doing these you might want to check with a hospital about donations. For CF specifically you can visit http://www.cff.org/ to find a CF center near you.

12.01.2011

Whew


Been juggling projects these last few weeks, but I've gotten quite a bit done. I finished my Hermione Hearts Ron hat. Turned out really cute I think. I really liked the yarn I used (even though I may be slightly allergic to Alpaca).
Used Cascade Yarns Alpaca Lana D'Oro
Really like the way this hat finished off!

I also got Josh's new beanie done, which I'm working on writing up the pattern for. Thought this one turned out pretty well too. Hopefully he'll wear this one! Should hopefully be getting this pattern up on Ravelry here in the next week or so, after some careful double checking of the pattern...
This one is Cascade Yarns 220 Superwash
In between hats I started a scarf just as an easy project while watching tv at night. This will also be for Josh. Got the pattern from Ravelry, it's called a waffle scarf.
Patons Classic Wool
Wow my last few projects are lacking color! Will have to something bright for my next project. Also I found out that my Alaina Beanie pattern had a few errors, so I got those changed. Guess that's about all, I have a bit of a headache so I'm not feeling to chatty today.

11.23.2011

Beanie Pattern!

Well I finally got it done! My first ever (for the public) beanie pattern. The PDF is available on ravelry.
The Alaina Beanie
(StitchNation Bamboo Ewe in Eucalyptus)
I gave the prototype to my sister, so I decided to name the pattern after her. I never cared much for patterns with people's names, but it's so much simpler than diamond moss stitch cables beanie which is what I was originally going to name this. My friend Kelli is testing the pattern for me, but I was so excited I had to go ahead and publish without waiting (hopefully I won't regret that!). There are many chances for errors, between the knitting and rewriting and such.

Now I'm already working on my second pattern that is a hat for my husband so it will be called the Josh Beanie (I've just decided to start naming them after whomever gets the prototype).


This is me. (I'm really un-photogenic and really don't like having
my picture taken)


11.07.2011

Pattern Making

Well I'm getting ready to start work on another moss stitch diamond cables beanie. This one should be the final one to work out all of the kinks in the pattern so I can get that posted finally. Fingers crossed...

Until then here's another nifty stitch that I've been using to make a lovely dark grey scarf. It's called Lacy Ladder and it's another one from Craft Cookie.

Update 11.8.11

I should have known I would get distracted! I signed up for a ravelry account yesterday (why have I not known about this place?!), and found a beanie that I must simply bump to the head of the line. It's Hermione Hearts Ron, and it's super super cute. Casting on here I come!

10.24.2011

New Camera

I got a new camera this weekend and I'm so excited! I got a Nikon D3100 to replace my old (10yrs) Nikon D100. My old one just wasn't shooting as well anymore and I had to do way too much Photoshop and the pics still weren't looking good. Took the new one out yesterday and did some shooting. Loving the way they turned out. The colors from this new camera are amazing! Almost makes me want to re-shoot my whole etsy store...


10.18.2011

Another Scarf

I've been working on knitting another scarf. This one is done with a stitch pattern called Wheat in the Wind from Craftcookie. I like the way it's turning out so far and it seems to work up pretty quickly which is always a bonus.

I'm using Lion Brand Wool-Ease for this project.

I'm kind of starting to get the sewing bug again, but I also have a few more knitting projects that I'm working on. I am going to try and work on those first, but no promises.

10.13.2011

Husband Beanie

Since I first started crocheting and knitting I've wanted to make the perfect beanie for my husband. See he has this store bought beanie that he's been wearing for years, he loves it.

This is it.


Now I've always wanted to make him one that he loves just as much...okay, more. Well to say the least my abilities have been pretty limited up until recently.

I've searched the internet for a pattern similar to this one to no avail. Finally I found a pattern for a hat that taught me how to do the diamond cables, which was a good start. So I got out the circular needles and after some trial and error ended up with this.


Do I think this will take the place of the store bought one? No. But it does have a better chance of actually getting worn than some of my previous atempts. I'm working on another one that has larger diamonds and the moss stitch texture inside of them, but that one won't be for him:) Will post pics and hopefully a pattern when I'm done. I made this using Stitch N Bitch's Bamboo Ewe.

Here is a photo of the beanie I made that taught me how to do the diamond cables.


It turned out a little too long for me, but it's cute and was great experience. Here is the link to the pattern for it.

This one was made with Lion Brand Yarn's Fisherman's Wool.


Just for fun here are a few of the beanies I've made for my husband over the years...