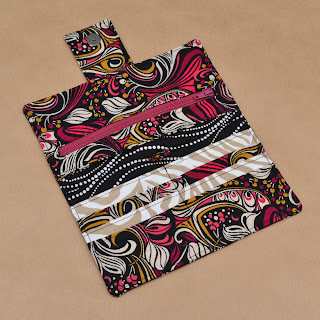
Well Josh didn't go snowboarding on Sunday like he had planned, so I'm just getting to work on my tutorial today. This is my first sewing tutorial and only like my second tutorial overall so hopefully it makes some sense, I did notice while editing photos that I got ahead of myself and didn't get some pics, but hopefully they were pretty self explanatory steps. This is done very similar to the wallets that I've done so if some of my expanations are lacking the
wallet tutorial should fill in the gaps. Well here goes nothin'...
Double Point Needle Case
Supplies
Fabric for outside, inside lining, pockets, and flap
Medium weight iron on interfacing
Heavy interfacing or Felt (optional to stabilize)
Magnetic snap
Instructions
Cut fabric as follows:
2 pieces 10.5"x13.5" (one for outide and one for inside lining)
1 piece 13.5"x8" (large inside pocket)
1 piece 13.5"x6" (small inside pocket)
2 pieces 13.25"x6.5" (inside flap)
2 pieces 2.5"x5" (snap tab)
1 piece 12.25"x9.5" (optional felt)
1. Take the 13.5"x8" piece, fold top side down 1/2" (so the wrong sides are facing), press.
Top stitch about 1/8" from the folded edge.
2. Repeat for 13.5"x6" piece.
3. Line up the bottoms of the two pocket pieces, making sure that the top edges are parallel.
4. Using fabric marker or pencil, mark lines for needle pockets. Mark lines on smaller pocket first, then transfer these lines to larger pocket. Add additional lines to larger pocket.
5. Pin larger pocket to inside liner (10.5"x13.5") lining up the bottom edges. Draw a line 1.75" from bottom. Stitch along this line. Then stitch along lines for pockets, stopping at top edge of pocket.
6. Pin smaller pocket to this piece lining up the bottom edges, make sure that the top edges are parallel and that the markings for the needle pockets line up. Stitch along lines for needle pockets, stopping at top edge of smaller pocket.
7. Take both 13.25"x6.5" pieces and pin right sides together. Using 1/4" seam allowance sew around edges leaving a hole for turning on one of the long sides. ( I did not interface this piece, but it couldn't hurt. If you do, use the medium weight)
 |
| I didn't take a photo before I stitched this up, but the yellow lines show where you should sew |
8. Clip corners and turn right side out. Press, tucking in the edges at hole used for turning.
9. Top stitch along 3 sides leaving one of the long sides unstitched.
10. Pin flap piece to top of inside piece (unstitched edge of flap piece at the top) . Line up 1/2" from top. Top stitch about 1/8" from edge of flap.
11. Using manufacturer's directions interface the back sides of the two 2.5"x5" pieces and the two
10.5"x13.5". (Use a heavy interfacing on the outside piece if desired)
12. Take the two 2.5"x5" pieces pin right sides together. With 1/4" seam allowance sew around leaving one of the small sides open.
13. Following manufacturer's directions attach the 'male' side of the magnetic snap to tap 3/4" from top edge (not the open edge). Turn right side out and press.
14. Top stitch 1/8" from edges leaving open side open.
15. Install 'female' side of magnetic snap to outside piece 1.75" from one of the small sides.
16. Tuck in the flap to avoid stitching it in the edges.
17. With right sides facing pin the outside piece to the inside piece. Place snap side at the left.
18. Using 1/2" seam allowance stitch around edge leaving an opening on the small right edge for turning.
19. Clip corners and turn right side out. Press, tucking in the edges at the opening used for turning.
(If you want to use a piece of felt to stabilize this insert it into the side at this point. I wish I had done this)
20. Insert snap tab piece into the hole used for turning, make sure the snaps align.
21. Top stitch around the main piece, you may need to switch to a heavier needle (I use a leather needle).
I hope these directions make sense and work correctly. If you want to make a roll bag instead of a book form, you can place the snap farther in from the edge, or substitute for velcro or use a ribbon as a tie. Also the measurements could easily be altered to hold paint brushes or straight knitting needles, even makeup brushes for traveling.


